Air layering produces faster results. Plants receive nutrients from the parent. Root development is stronger. Survival rates are high. Seedlings adapt quickly after separation. This method works for woody plants. Fruit trees respond very well. Air layering reduces failure risks. It saves time compared to seeds. Strong seedlings ensure better yields.
Best Plants for Air Layering
Fruit trees are ideal for air layering. Mango and guava respond well. Citrus plants layer successfully. Ficus and hibiscus are popular choices. Ornamental shrubs work nicely. Plants with flexible branches perform best. Healthy plants give better results. Avoid weak or diseased plants. Woody stems are preferred. Proper selection improves success.
Best Time for Air Layering
Timing affects root formation speed. Spring is the best season. Warm temperatures encourage growth. Humidity helps root development. Avoid extreme cold or heat. Monsoon season also works well. Active growth phase is ideal. Avoid dormant periods. Proper timing ensures faster rooting. Seasonal awareness improves results.

Tools Needed for Air Layering
Basic tools are sufficient. Sharp knife or blade is needed. Plastic wrap or sheet is required. Moist medium like coco coir works well. Twine or tape secures wrapping. Clean tools prevent infection. A spray bottle helps moisture control. Gloves protect hands. Simple tools make process easy. Preparation ensures smooth work.
Choosing the Right Branch
Select a healthy branch. Branch thickness should be moderate. Avoid very young shoots. Avoid very old woody branches. Branch should receive sunlight. Choose disease-free stems only. Flexible branches are easier to wrap. Strong branches form better roots. Proper branch selection matters. Healthy branches ensure success.
Preparing the Branch for Layering
Remove a small ring of bark. The cut should be clean. Expose inner tissue carefully. This encourages root formation. Do not damage the wood. Proper depth is important. Too shallow cuts fail. Too deep cuts harm branch. Clean preparation improves rooting. Precision matters greatly.

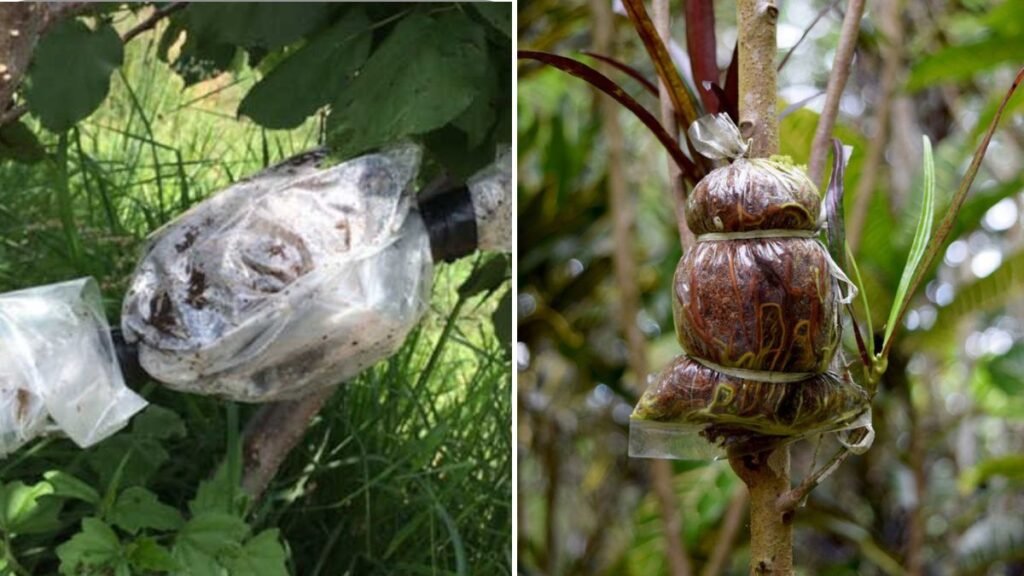
Applying the Rooting Medium
Moist coco coir is ideal. Sphagnum moss also works well. Wrap medium around exposed area. Ensure even coverage. Medium should stay moist. Avoid dripping wet conditions. Good moisture promotes root growth. Dry medium slows rooting. Balanced moisture is essential. Medium quality affects results.
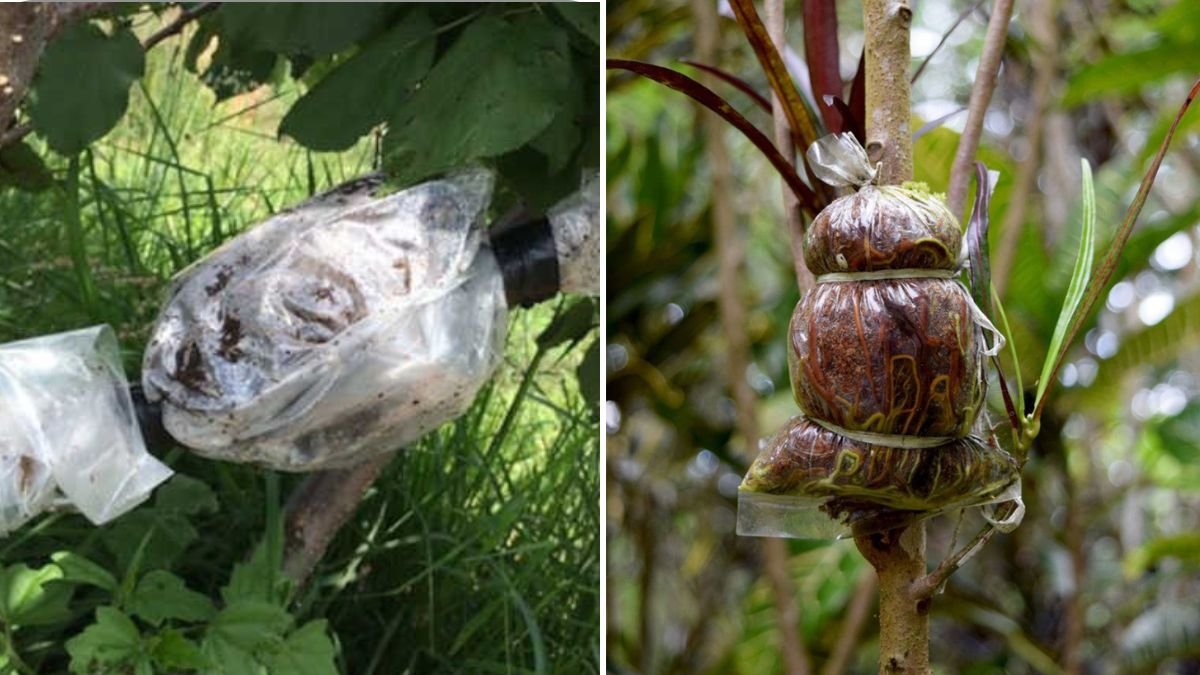
Wrapping and Securing the Layer
Wrap plastic around the medium. Seal both ends tightly. Prevent moisture loss. Secure with string or tape. Transparent wrap helps monitoring. Avoid air gaps inside. Wrapping must be firm. Proper sealing keeps humidity high. Stability is important. Secure layers root better.
Maintaining Moisture Levels
Check moisture regularly. Dry medium stops rooting. Add water if needed. Use a syringe or spray bottle. Avoid opening wrap too often. Consistent humidity is crucial. Too much water causes rot. Balance is important. Monitoring improves success. Moisture control ensures healthy roots.

How Long Roots Take to Form
Rooting time varies by plant. Most plants root in four to eight weeks. Warm weather speeds process. Healthy branches root faster. Woody plants take longer. Patience is important. Avoid disturbing early roots. Check progress gently. Visible roots indicate readiness. Time investment pays off.
Cutting and Separating the New Seedling
Once roots appear, cut below roots. Use a clean sharp tool. Avoid damaging new roots. Handle gently during removal. Immediate planting is recommended. Cutting at right time is crucial. Too early separation weakens plant. Proper timing ensures survival. Gentle handling protects roots. Care improves establishment.
Planting the Air-Layered Seedling
Prepare pot or soil beforehand. Use loose fertile soil. Place seedling carefully. Cover roots completely. Water gently after planting. Keep in partial shade initially. Avoid direct sun early. Roots need time to adjust. Gradual exposure strengthens plant. Proper planting ensures success.

Aftercare for Air-Layered Plants
Water regularly but lightly. Avoid overwatering initially. Keep plant shaded for few days. Gradually introduce sunlight. Do not fertilize immediately. Allow roots to settle. Monitor leaf condition. Healthy leaves indicate success. Careful aftercare boosts survival. Patience ensures growth.
Common Mistakes in Air Layering
Cutting too deep damages branch. Using dry medium fails rooting. Poor sealing causes moisture loss. Separating too early weakens plant. Ignoring plant health reduces success. Using wrong season slows growth. Lack of monitoring causes failure. Learning mistakes improves technique. Practice builds confidence. Avoid errors for better results.
Advantages Over Other Propagation Methods
Air layering produces mature plants faster. Higher success than cuttings. Seedlings retain parent traits. Less maintenance required. Suitable for difficult plants. Reduces waiting time. Strong roots improve survival. Ideal for fruit trees. Reliable method for home gardeners. Efficiency makes it popular.

Table: Air Layering Essentials
| Aspect | Recommendation | Benefit |
| Plant type | Healthy woody plants | Strong seedlings |
| Medium | Moist coco coir | Faster rooting |
| Season | Spring or warm weather | High success |
| Wrapping | Airtight plastic | Moisture retention |
| Separation | After root formation | Better survival |
Final Thoughts
Creating seedlings by air is simple and effective. It produces strong plants quickly. Beginners can master it easily. Minimal tools are required. Success rates are high. Plants grow faster after planting. Air layering saves time and effort. Ideal for fruit and ornamental plants. Proper care ensures success. Air layering is worth practicing.