Gardening enthusiasts and DIY lovers often seek innovative ways to beautify their outdoor spaces. One creative approach is transforming old wooden crates into a modular garden wall. This idea not only utilizes recycled materials but also adds a rustic charm that can enhance any garden design. In this article, we will explore the steps to achieve this transformation, the benefits of wooden crate walls, and considerations to keep in mind.
Understanding Modular Garden Walls
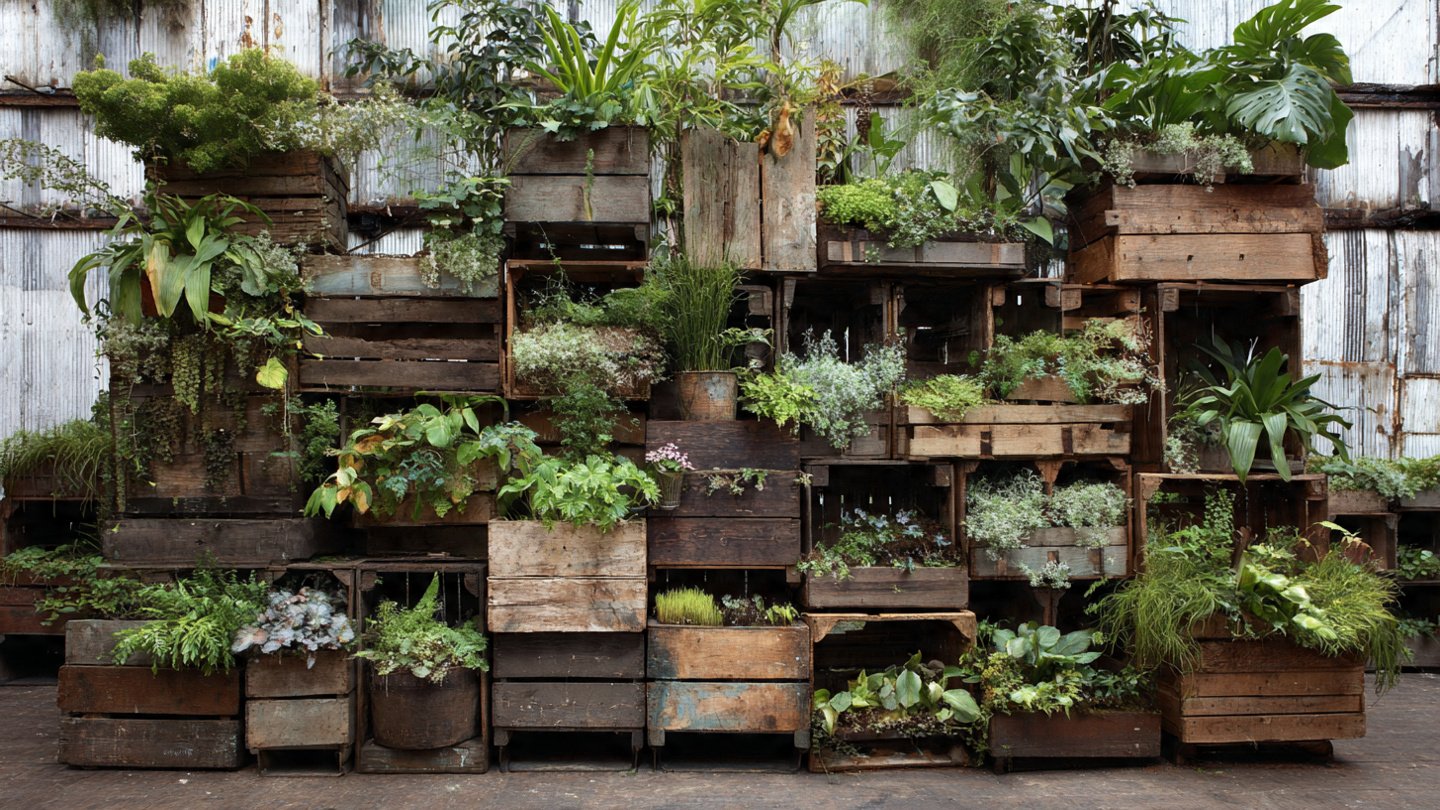
A modular garden wall is essentially a flexible, customizable structure that can serve various purposes, such as creating raised beds, providing vertical gardening space, or acting as a decorative element. By employing modular systems, gardeners can adapt their walls to fit the specific needs of their plants and landscape.
Wooden crates, often used for transporting fruits and vegetables, are an ideal material for creating these types of walls due to their natural aesthetic and functional design. They come in various sizes, are usually lightweight, and can be easily stacked or arranged to create various forms. This flexibility allows you to tailor the wall to your garden’s layout and requirements.
Benefits of Using Old Wooden Crates
Transforming old wooden crates into a garden wall comes with several advantages:
- Eco-Friendly: Repurposing wooden crates reduces waste and minimizes the demand for new materials.
- Cost-Effective: Using discarded crates can significantly lower your gardening costs.
- Customizable: You can paint, stain, or leave wood natural to match your garden theme.
- Versatile: They can be used for various purposes—planters, walls, trellises, or even storage.
- Easy to Work With: Most wooden crates are easy to maneuver due to their lightweight nature.

Steps to Transform Wooden Crates into a Modular Garden Wall
Creating a modular garden wall from wooden crates involves several stages. Here’s a step-by-step guide:
1. Gather Materials
Before you start, collect the following materials:
- Old wooden crates (select based on size preferences)
- Wood screws or nails
- Wood glue (optional for added stability)
- Sandpaper
- Outdoor wood sealant or paint (if desired)
- Plants or soil for the crates

2. Prepare the Crates
Examine the wooden crates for damage or rot. Sand any rough edges to avoid splinters. If you want to protect them from moisture or change their appearance, apply a coat of outdoor sealant or paint. Allow sufficient time for the finish to dry.
3. Plan the Layout
Consider how you want to arrange your crates. You might stack them vertically, place them horizontally, or create an alternating pattern. Sketch a rough layout to visualize how your garden wall will appear before you start assembling the crates.
4. Assemble the Crates
Begin placing the crates in your desired configuration. Use wood screws to secure the crates together if necessary, ensuring they are sturdy. Make sure to check for any gaps, as these could affect the stability of your structure.

5. Fill with Soil and Plants
Once your modular wall is secure, fill the crates with soil and choose your plants. You can opt for herbs, flowers, or trailing plants that will spill over the edges, adding a vibrant touch to your wall.
6. Maintenance
After installation, monitor your plants’ growth and ensure they receive adequate water and nutrients. Periodically check the structural integrity of your wall and make adjustments if necessary.
Design Ideas for Your Crate Wall
To maximize the aesthetic appeal of your wooden crate garden wall, consider the following design ideas:
- Colorful Plantings: Use a combination of colorful flowers and foliage to create striking visual contrasts.
- Varied Heights: Stack crates of different sizes to create a visually dynamic wall.
- Integrated Trellis: Attach wires or mesh to some crates to support climbing plants.
- Seasonal Decor: Change out plants or decorations based on the season for fresh looks throughout the year.

Conclusion
Transforming old wooden crates into a modular garden wall can be a fun and rewarding project for garden enthusiasts. Not only do you recycle materials, but you also create a stunning focal point that enhances the aesthetics of your outdoor space. With a little creativity and effort, your new garden wall will contribute to a more structured environment that allows you to showcase your favorite plants while also serving practical purposes.
FAQs
1. Can any type of wooden crate be used?
While any wooden crate can be used, it’s best to select crates made from durable wood, such as pine or cedar, as they can withstand outdoor elements better.
2. How do I ensure the crates last in outdoor conditions?
Applying a good sealant or paint can protect the wood from moisture and prolong its lifespan. Regular maintenance checks will also help identify any wear and tear early.

3. What types of plants work best in wooden crates?
Herbs, succulents, and trailing plants are great choices for wooden crates. These plants not only thrive in constrained spaces but also create beautiful visual displays.
4. How much soil should I use in each crate?
The amount of soil depends on the depth and type of plants you intend to use. Generally, filling the crates to about 1-2 inches below the top is sufficient to allow for water retention and root growth.
5. Can I change the arrangement of my modular wall later?
Absolutely! The modular design allows you to rearrange the crates as desired. You can shift them around freely whenever you wish to change the structure of your garden.